
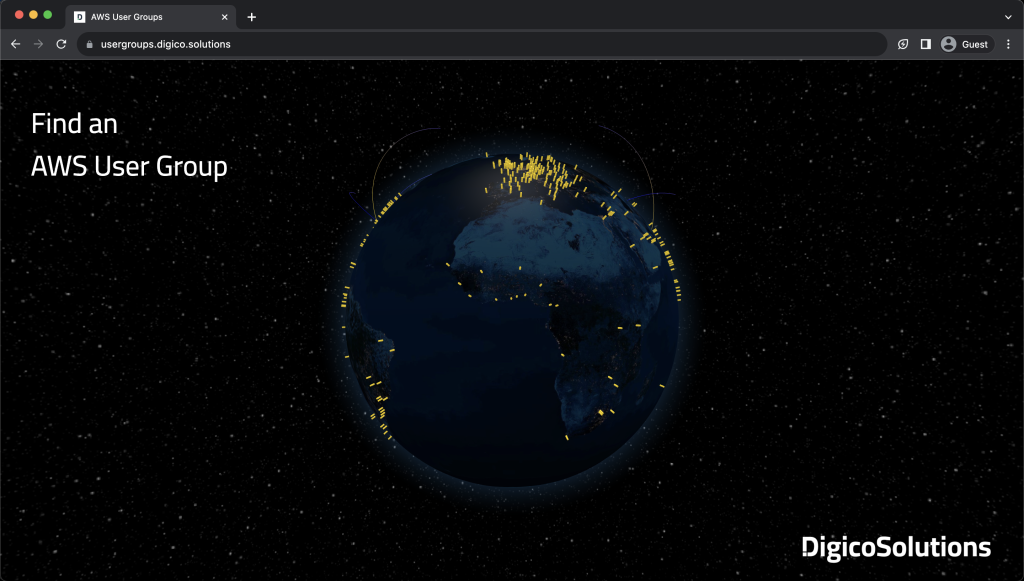
Effective visualization plays a crucial role in making complex data accessible and informative. In today’s blog post, we will explore how to harness the power of Globe.gl, coupled with some fundamental Three.js knowledge, to transform raw AWS User Groups data into an engaging and interactive globe-spanning visualization. We will also demonstrate how the integration of AWS services such as Amazon S3 and CloudFront can expedite the deployment of our globe visualization, making it accessible to millions of people worldwide within minutes.
For the full step by step documentation please review my blog post on dev.to at:
Creating Interactive Globe Visualizations with Globe.gl: A Step-by-Step Guide using Amazon S3 and CloudFront
Note: this is a community based project and we would be more than thrilled to have your contribution or feedback at community@digico.me to help in shaping it for the AWS community.
1. Building the Visualization with Globe.gl and Three.js:
-
- Globe Creation:
-
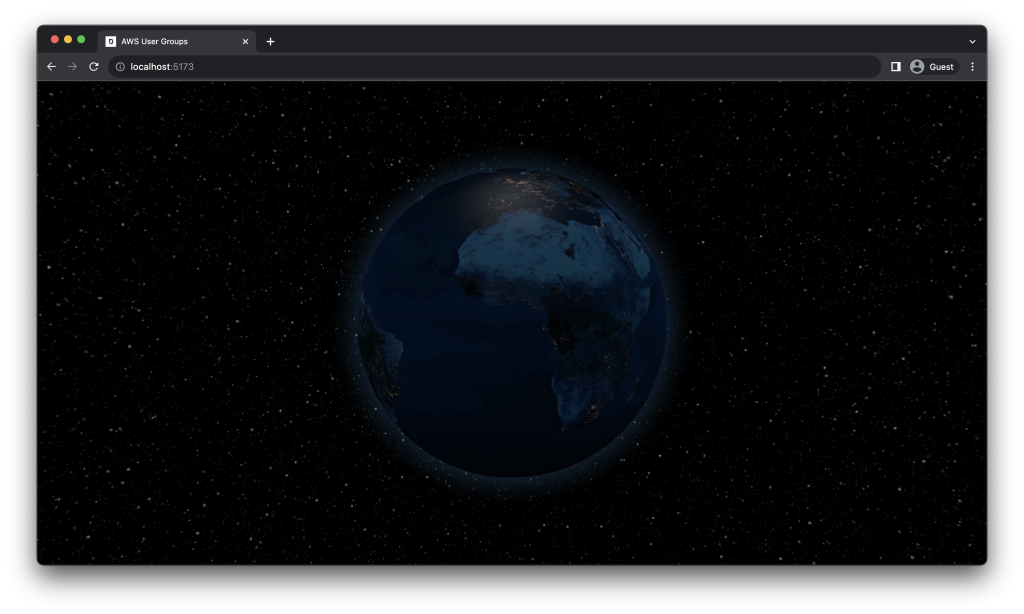
- We recommend using Globe.gl, a library built on top of Three.js, to simplify the process of creating 3D globe visualizations. Three.js is a popular JavaScript library for creating and animating 3D computer graphics.
-
- We will use JavaScript code to interact with Globe.gl and configure functionalities like globe appearance, lighting, and camera controls.
-
- The step-by-step guide mentions specifying images for the globe itself and potentially a background image to enhance the visualization.
-
- Globe Creation:
-
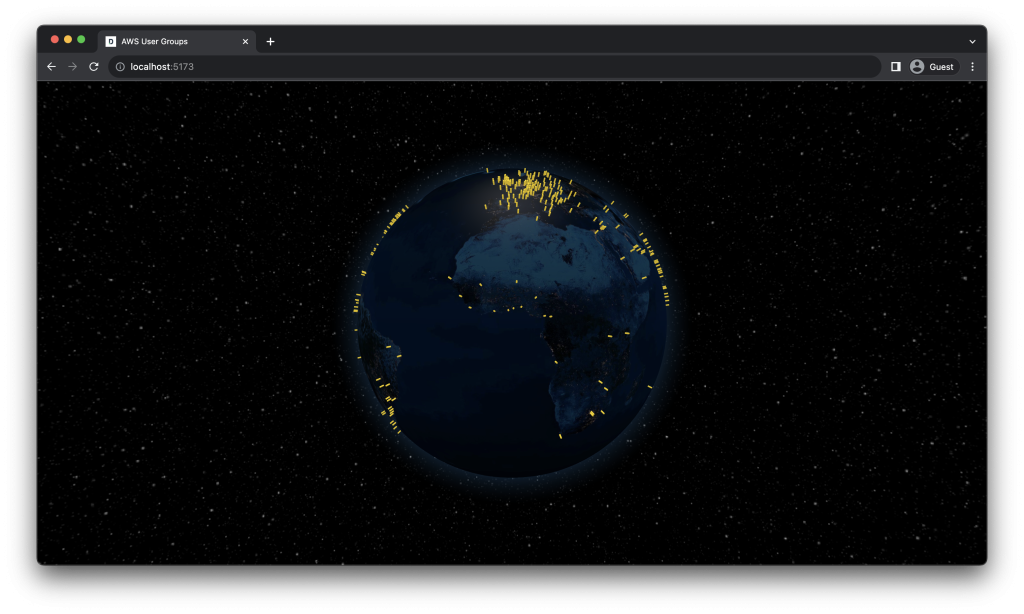
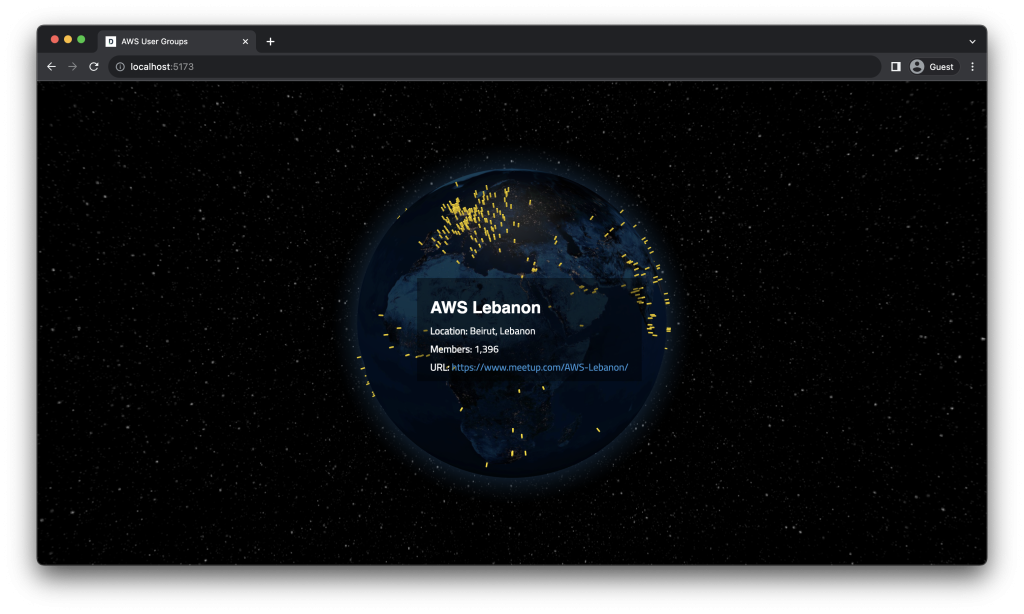
- User Group Pins:
-
- We then transform the AWS user group data (available in the JSON format) into visual elements like pins displayed on the globe. The format is as such:
[ { “ugName”: ” AWS User Group Timisoara”,
“ugLocation”: “Timisoara, Romania”,
“ugURL”: “https://www.meetup .com/aws-timisoara”,
“ugCategory”: “General AWS User Groups” }
,{
“ugName”: “AWS Abidjan User Group”,
“ugLocation”: “Abidjan, Ivory Coast”,
“ugURL”: “https://www.meetup .com/groupe-meetup-abidjan-amazon-web-services/ “,
“ugCategory”: “General AWS User Groups” }, -
*The complete data extraction and processing detail is available in the step-by-step guideline.
- We then transform the AWS user group data (available in the JSON format) into visual elements like pins displayed on the globe. The format is as such:
-
- These pins can be customized with attributes like size, color, and information popups that appear when clicked by the user. This allows users to explore details about the AWS user groups at specific locations and to provide more detail for the user.
-
- User Group Pins:
-
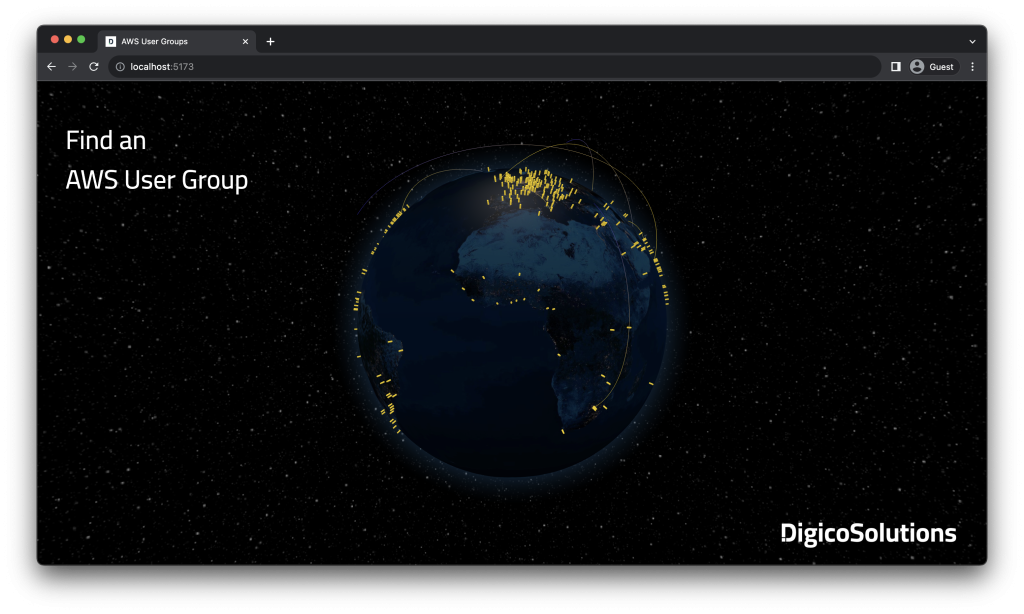
- Dynamic Arcs (Optional):
-
- We created dynamic arcs to visually connect different user groups on the globe whereas each arc start-point and end-point are representative of an AWS User Group. This can be achieved using JavaScript code to calculate and render these arcs based on user group locations.
-
- Dynamic Arcs (Optional):
2. Deployment on AWS S3 for Global Accessibility:
-
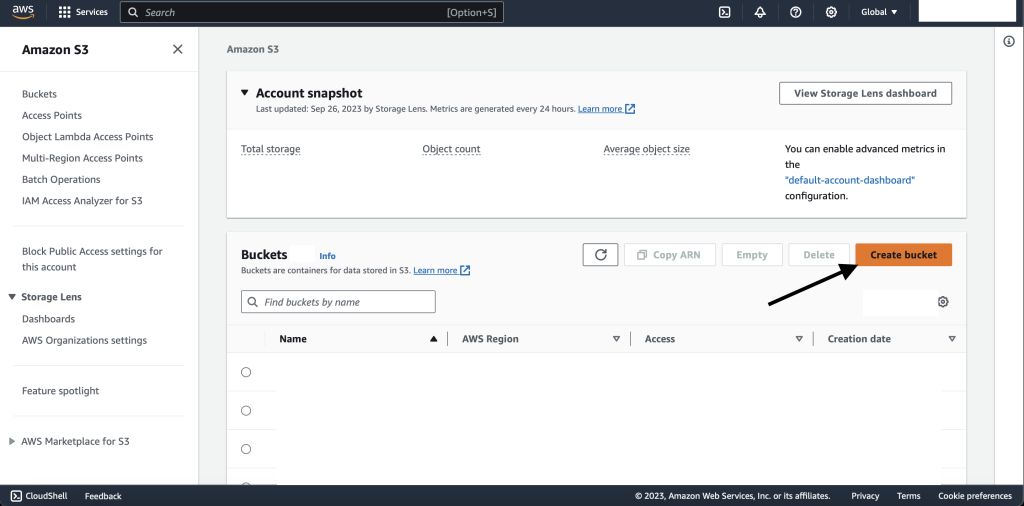
- Setting Up an S3 Bucket:
-
- We used Amazon S3, a scalable and cost-effective storage service offered by AWS (Amazon Web Services), to host the visualization files.
-
- You’ll need to create a bucket within your S3 account and give it a unique name that follows AWS naming conventions.
-
- In the example, the bucket is named “usergroups.digico.solutions,” which aligns with the intended subdomain for the website. This is essential if you would like to only host through S3 Static Hosting. If coupled with CloudFront, different set up could be implemented.
-
- An important step is to untick the “Block all public access” option to allow public access to your website files, ensuring anyone can view your visualization.
-
- Setting Up an S3 Bucket:
-
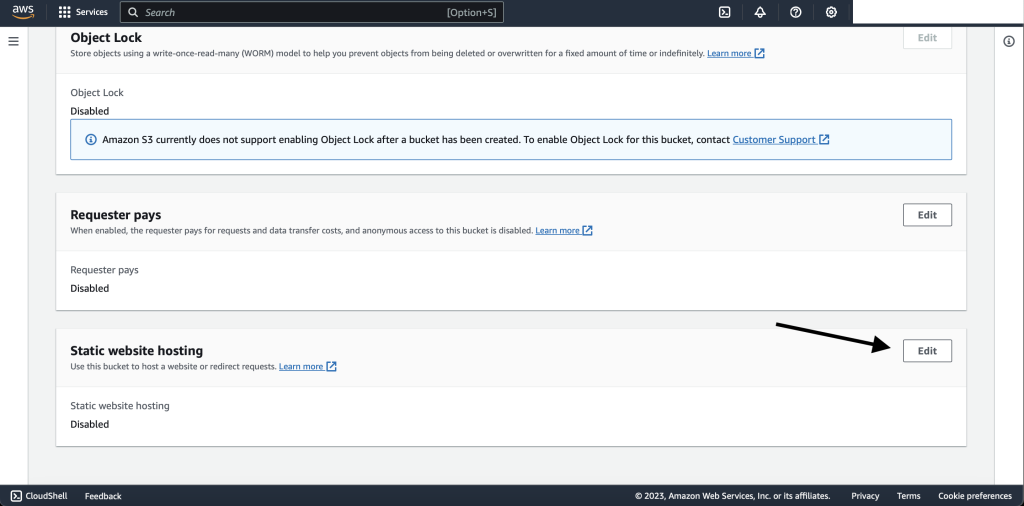
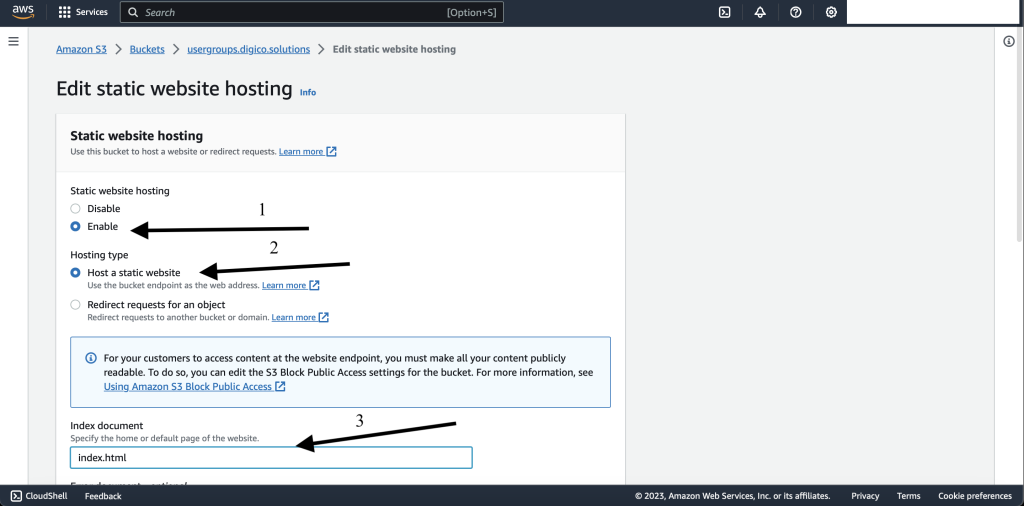
- Configuring Static Website Hosting:
-
- After uploading your visualization files (HTML, CSS, JavaScript, and images) to the S3 bucket, you need to enable static website hosting.
-
- This tells S3 to serve your website files when someone tries to access the website through a web browser.
-
- This can be done by navigating to the bucket’s “Properties” section and enabling static website hosting. You’ll also need to specify the name of your index document (usually “index.html”) which acts as the entry point for your website.
-
- Configuring Static Website Hosting:
-
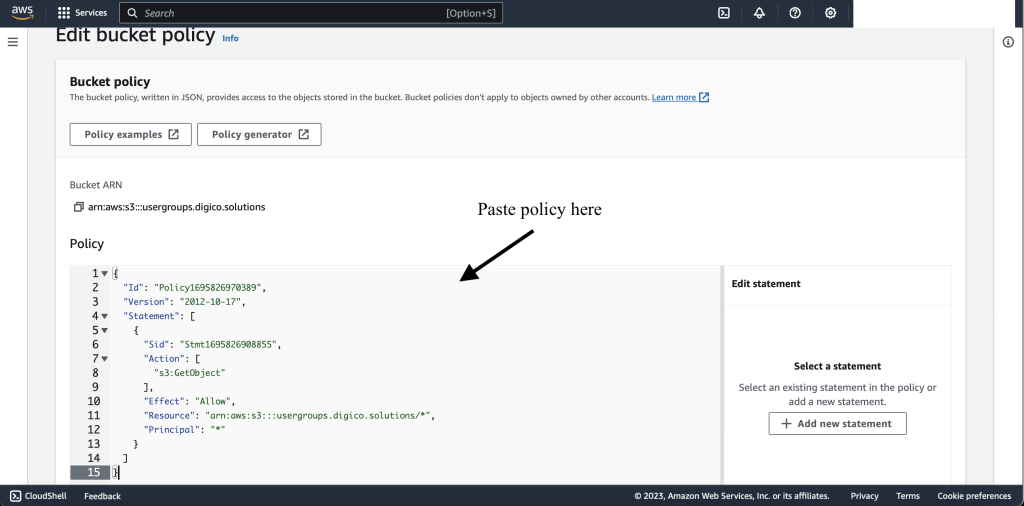
- Enabling Public Access with Bucket Policy:
-
- By default, S3 buckets might not allow public access. To ensure your website is accessible globally, you’ll need to create a bucket policy that grants public read access to your objects.
-
- The guide walks you through the steps of creating a policy using the AWS Policy Generator. This involves specifying that the policy allows the “GetObject” action for the principal “*” (everyone).
Note: this policy is very permissive and usually only specified Principals are allowed. For example, the CloudFront distribution on top of the S3.
- The guide walks you through the steps of creating a policy using the AWS Policy Generator. This involves specifying that the policy allows the “GetObject” action for the principal “*” (everyone).
-
- You’ll also need to include the ARN (Amazon Resource Name) of your S3 bucket in the policy document.
-
- Enabling Public Access with Bucket Policy:
3. Securing and Serving with CloudFront for Enhanced Performance:
-
- Obtaining an SSL Certificate:
-
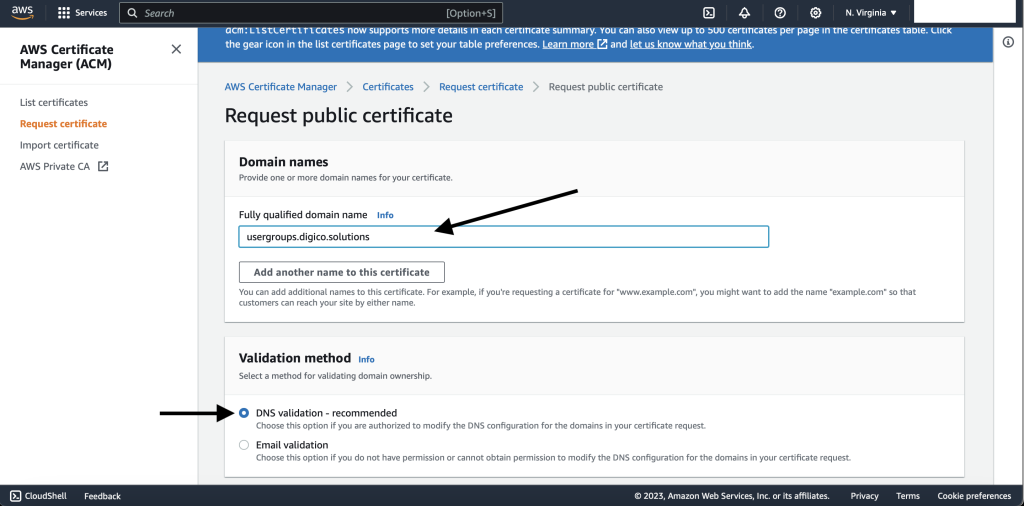
- To secure your website and encrypt data in transit, we obtain an SSL certificate from AWS Certificate Manager (ACM). This ensures user privacy and builds trust with your visitors.
Note that the certificate must be requested in the ‘N. Virginia” region.
- To secure your website and encrypt data in transit, we obtain an SSL certificate from AWS Certificate Manager (ACM). This ensures user privacy and builds trust with your visitors.
-
- Select the “Request a public certificate” option and specifying the fully qualified domain name (FQDN) or subdomain you plan to use for your website
(e.g., “usergroups.digico
.solutions”).
- Select the “Request a public certificate” option and specifying the fully qualified domain name (FQDN) or subdomain you plan to use for your website
-
- Then, choose DNS validation and select “RSA 2048” as a common and secure key algorithm.
-
- Obtaining an SSL Certificate:
-
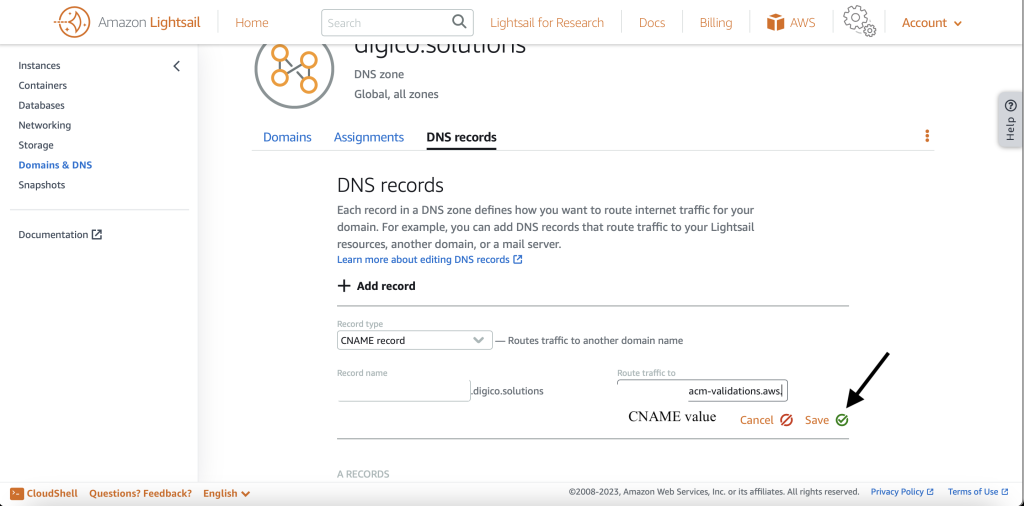
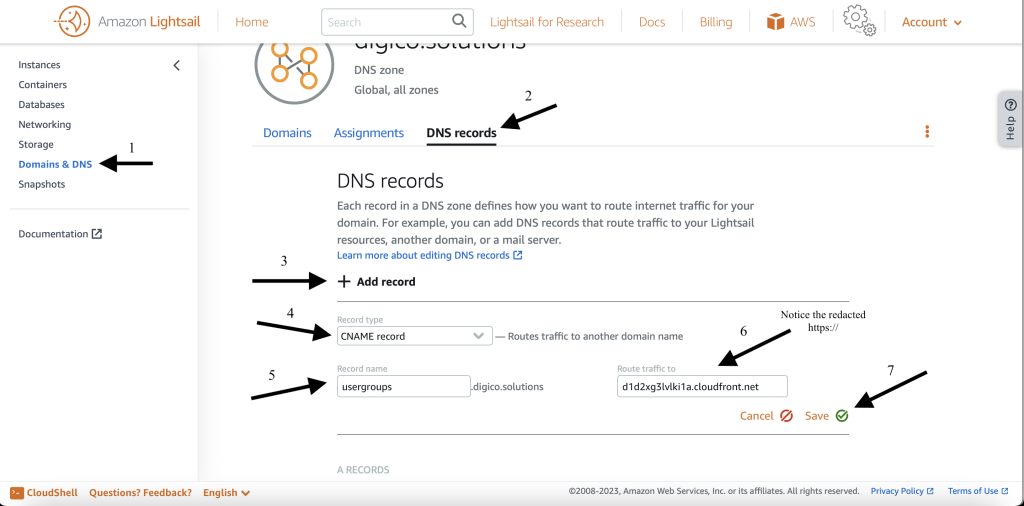
- Managing DNS Records:
-
- To use your SSL certificate, you’ll need to make changes to your domain’s DNS records. These records point your domain name to the S3 bucket where your website files reside.
-
- For our setup, we are using Lightsail’s DNS management for demonstration purposes, but the process can be similar with other domain registrars or DNS hosting providers.
-
- You’ll need to create a CNAME record that maps your desired subdomain to the CloudFront distribution domain name we’ll configure in the next step.
-
- Managing DNS Records:
-
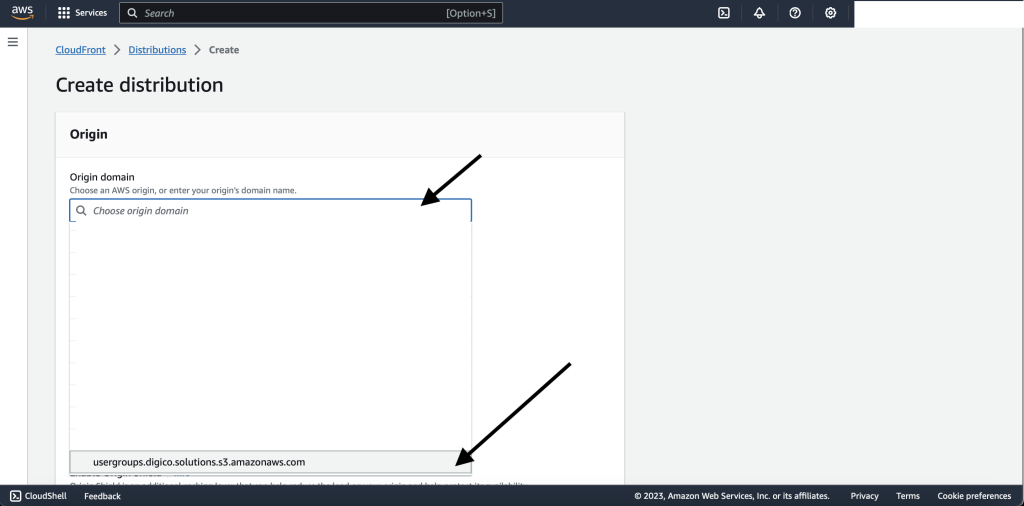
- Configuring CloudFront:
-
- To improve website performance and user experience globally, we suggest using Amazon CloudFront, a content delivery network (CDN) service offered by AWS which has 310+ Points of Presence (300+ Edge locations and 13 regional mid-tier caches) in 90+ cities across 47 countries.
-
- CloudFront caches your website content across the multiple edge locations around the world, delivering it to users
-
- First off, create a CF distribution and set your S3 bucket as the origin.
-
- Configuring CloudFront:
Configure the regions and add the certificate that was requested.
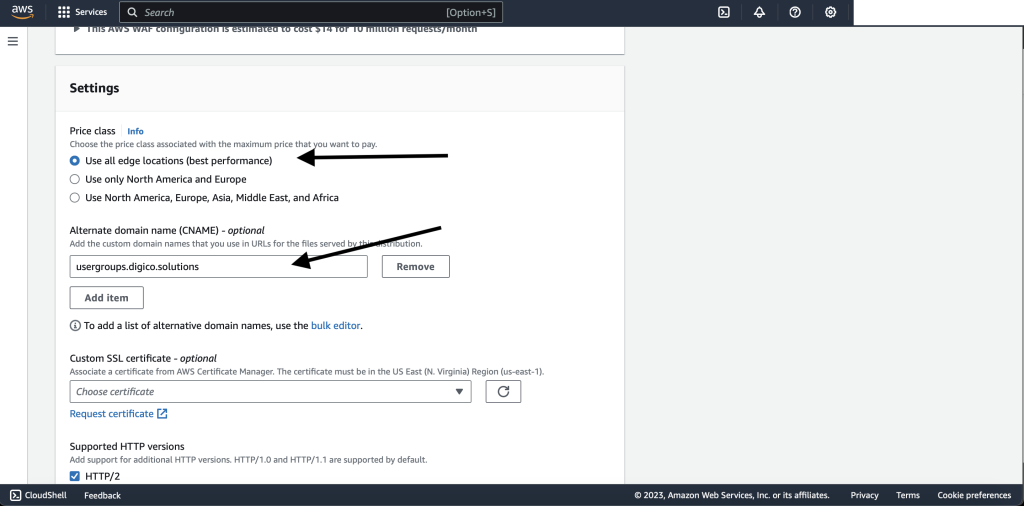
Create a CNAME record in Lightsail to point your domain to your Cloudfront distribution.
Finally, you will have the domain ready to display your AWS user group globe!
Final Thoughts & Contribution
Thank you for following along the journey of creating an exciting yet beneficial and well-rounded AWS project. This project has demonstrated the power of leveraging AWS services to build a comprehensive solution. We successfully integrated backend development with a user-friendly frontend and design, culminating in a rapid deployment on AWS. The utilization of services like S3, ACM, and CloudFront streamlined the process, ensuring the project became readily available to end users within minutes.
However, this is just the first step. We plan to enhance the project by improving mobile responsiveness and adding new functionalities. We welcome your ideas and contributions. Feel free to reach out to us at “community@digico.me“.
Effective visualization plays a crucial role in making complex data accessible and informative. In today’s blog post, we will explore how to harness the power of Globe.gl, coupled with some fundamental Three.js knowledge, to transform raw AWS User Groups data into an engaging and interactive globe-spanning visualization. We will also demonstrate how the integration of AWS services such as Amazon S3 and CloudFront can expedite the deployment of our globe visualization, making it accessible to millions of people worldwide within minutes.
For the full step by step documentation please review my blog post on dev.to at:
Creating Interactive Globe Visualizations with Globe.gl: A Step-by-Step Guide using Amazon S3 and CloudFront
Note: this is a community based project and we would be more than thrilled to have your contribution or feedback at community@digico.me to help in shaping it for the AWS community.
1. Building the Visualization with Globe.gl and Three.js:
Globe Creation:
We recommend using Globe.gl, a library built on top of Three.js, to simplify the process of creating 3D globe visualizations. Three.js is a popular JavaScript library for creating and animating 3D computer graphics.
We will use JavaScript code to interact with Globe.gl and configure functionalities like globe appearance, lighting, and camera controls.
The step-by-step guide mentions specifying images for the globe itself and potentially a background image to enhance the visualization.
User Group Pins:
We then transform the AWS user group data (available in the JSON format) into visual elements like pins displayed on the globe. The format is as such:
[ { “ugName”: ” AWS User Group Timisoara”,
“ugLocation”: “Timisoara, Romania”,
“ugURL”: “https://www.meetup .com/aws-timisoara”,
“ugCategory”: “General AWS User Groups” }
,{
“ugName”: “AWS Abidjan User Group”,
“ugLocation”: “Abidjan, Ivory Coast”,
“ugURL”: “https://www.meetup .com/groupe-meetup-abidjan-amazon-web-services/ “,
“ugCategory”: “General AWS User Groups” },
*The complete data extraction and processing detail is available in the step-by-step guideline.
These pins can be customized with attributes like size, color, and information popups that appear when clicked by the user. This allows users to explore details about the AWS user groups at specific locations and to provide more detail for the user.
Dynamic Arcs (Optional):
We created dynamic arcs to visually connect different user groups on the globe whereas each arc start-point and end-point are representative of an AWS User Group. This can be achieved using JavaScript code to calculate and render these arcs based on user group locations.
2. Deployment on AWS S3 for Global Accessibility:
Setting Up an S3 Bucket:
We used Amazon S3, a scalable and cost-effective storage service offered by AWS (Amazon Web Services), to host the visualization files.
You’ll need to create a bucket within your S3 account and give it a unique name that follows AWS naming conventions.
In the example, the bucket is named “usergroups.digico.solutions,” which aligns with the intended subdomain for the website. This is essential if you would like to only host through S3 Static Hosting. If coupled with CloudFront, different set up could be implemented.
An important step is to untick the “Block all public access” option to allow public access to your website files, ensuring anyone can view your visualization.
Configuring Static Website Hosting:
After uploading your visualization files (HTML, CSS, JavaScript, and images) to the S3 bucket, you need to enable static website hosting.
This tells S3 to serve your website files when someone tries to access the website through a web browser.
This can be done by navigating to the bucket’s “Properties” section and enabling static website hosting. You’ll also need to specify the name of your index document (usually “index.html”) which acts as the entry point for your website.
Enabling Public Access with Bucket Policy:
By default, S3 buckets might not allow public access. To ensure your website is accessible globally, you’ll need to create a bucket policy that grants public read access to your objects.
The guide walks you through the steps of creating a policy using the AWS Policy Generator. This involves specifying that the policy allows the “GetObject” action for the principal “*” (everyone).
Note: this policy is very permissive and usually only specified Principals are allowed. For example, the CloudFront distribution on top of the S3.
You’ll also need to include the ARN (Amazon Resource Name) of your S3 bucket in the policy document.
3. Securing and Serving with CloudFront for Enhanced Performance:
Obtaining an SSL Certificate:
To secure your website and encrypt data in transit, we obtain an SSL certificate from AWS Certificate Manager (ACM). This ensures user privacy and builds trust with your visitors.
Note that the certificate must be requested in the ‘N. Virginia” region.
Select the “Request a public certificate” option and specifying the fully qualified domain name (FQDN) or subdomain you plan to use for your website
(e.g., “usergroups.digico.solutions”).
Then, choose DNS validation and select “RSA 2048” as a common and secure key algorithm.
Managing DNS Records:
To use your SSL certificate, you’ll need to make changes to your domain’s DNS records. These records point your domain name to the S3 bucket where your website files reside.
For our setup, we are using Lightsail’s DNS management for demonstration purposes, but the process can be similar with other domain registrars or DNS hosting providers.
You’ll need to create a CNAME record that maps your desired subdomain to the CloudFront distribution domain name we’ll configure in the next step.
Configuring CloudFront:
To improve website performance and user experience globally, we suggest using Amazon CloudFront, a content delivery network (CDN) service offered by AWS which has 310+ Points of Presence (300+ Edge locations and 13 regional mid-tier caches) in 90+ cities across 47 countries.
CloudFront caches your website content across the multiple edge locations around the world, delivering it to users
First off, create a CF distribution and set your S3 bucket as the origin.
Configure the regions and add the certificate that was requested.
Create a CNAME record in Lightsail to point your domain to your Cloudfront distribution.
Finally, you will have the domain ready to display your AWS user group globe!
Final Thoughts & Contribution
Thank you for following along the journey of creating an exciting yet beneficial and well-rounded AWS project. This project has demonstrated the power of leveraging AWS services to build a comprehensive solution. We successfully integrated backend development with a user-friendly frontend and design, culminating in a rapid deployment on AWS. The utilization of services like S3, ACM, and CloudFront streamlined the process, ensuring the project became readily available to end users within minutes.
However, this is just the first step. We plan to enhance the project by improving mobile responsiveness and adding new functionalities. We welcome your ideas and contributions. Feel free to reach out to us at “community@digico.me“.