In the ever-evolving world of AI, chatbots have emerged as indispensable tools for businesses to engage with customers. However, building intelligent and effective chatbots has often been perceived as a daunting task, requiring specialized skills and expertise. Introducing Amazon Lex and Amazon Bedrock – two game-changing AI services from Amazon Web Services (AWS) that democratize chatbot development, empowering developers of all levels to create conversational interfaces with ease.
What is Amazon Lex V2?
Amazon Lex V2 combines the deep functionality of natural language understanding (NLU) and automatic speech recognition (ASR) to create highly engaging user experiences. It enables developers to build lifelike, conversational interactions that can be integrated into a variety of applications, from mobile apps to web platforms and chat services.
Enhanced flexibility allows developers to customize chatbots to meet specific needs and preferences. Its intuitive user interface and comprehensive documentation simplify the development process, making it easier for developers of all levels to create and deploy bots efficiently. With advanced NLU and ASR capabilities, Amazon Lex V2 accurately interprets user inputs and responds intelligently. Additionally, its integration with Amazon Bedrock enables chatbots to access a vast knowledge base and generate adaptive, contextually relevant responses in real-time.
Harnessing the Power of Amazon Bedrock
Amazon Bedrock adds an extra layer of intelligence and creativity to chatbots, enabling them to generate dynamic responses and engage users in more meaningful conversations. By combining Amazon Lex V2 with Amazon Bedrock, developers can create chatbots that not only understand user inputs but also provide personalized and contextually relevant responses.
Practical Application:
Now, without Further Ado, let’s delve into the steps we followed to build our demonstration chatbot for Digico Solutions, leveraging the power of Amazon Lex and Amazon Bedrock combined:

Setting Up an S3 Bucket for Data Storage
First, we established an S3 bucket to serve as our data repository. In this instance, we utilized it to store the web pages of our website, which will act as the primary data source for the Amazon Bedrock knowledge base. This repository functions as a reference for the Amazon Lex bot, facilitating its interactions. You can visualize this setup below.
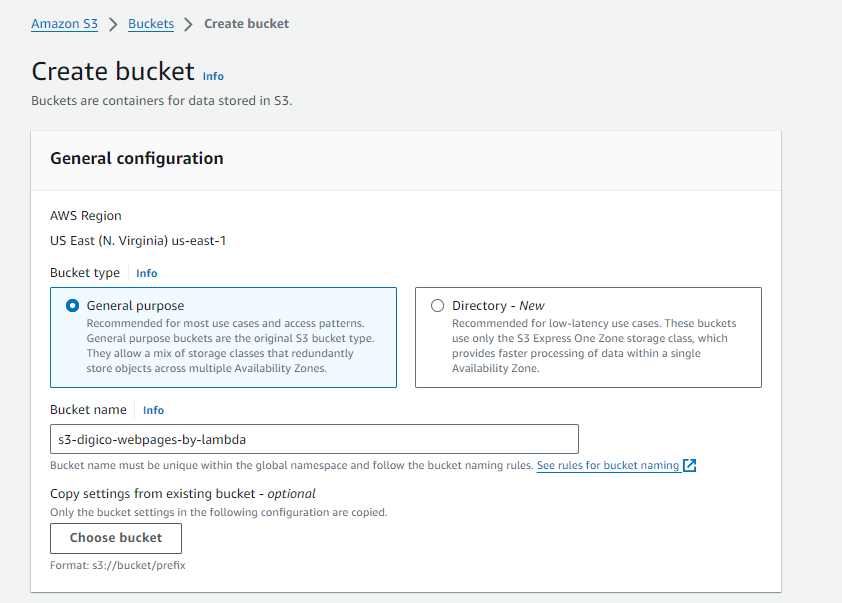
Lambda Function with S3 Access
We then crafted a Lambda function to navigate through the web pages of our website and upload them to an Amazon S3 bucket. To enable this process, we assigned an IAM role to the Lambda function, providing it with the necessary permissions to access the S3 bucket and perform operations on it.
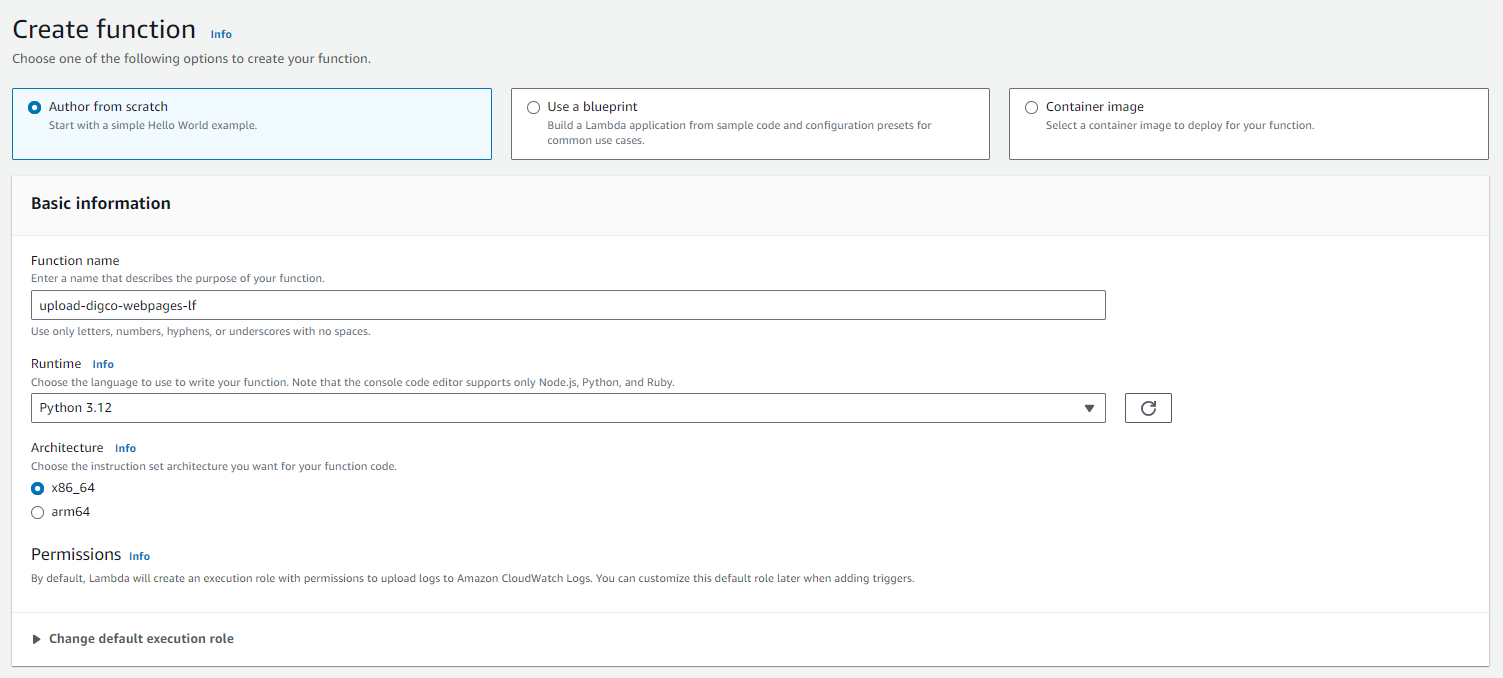
					import boto3
import json
import requests
from bs4 import BeautifulSoup
from urllib.parse import urljoin, urlparse

def get_links_within_domain(url):
    # Fetch the HTML content of the URL
    response = requests.get(url)
    if response.status_code != 200:
        print(f"Failed to retrieve the URL: {url}")
        return []
    # Parse the HTML content using BeautifulSoup
    soup = BeautifulSoup(response.text, 'html.parser')
    # Extract the base domain to ensure we only collect links within the same domain
    base_domain = urlparse(url).netloc
    # Find all links within the same domain
    links = set()
    for a_tag in soup.find_all('a', href=True):
        link = a_tag['href']
        # Resolve relative URLs
        full_url = urljoin(url, link)
        # Check if the link is within the same domain
        if urlparse(full_url).netloc == base_domain:
            links.add(full_url)
    # Remove links where the last phrase starts with #
    cleaned_links = [link for link in links if not link.split('/')[-1].startswith('#')]
    return cleaned_links

def lambda_handler(event, context):
    s3_client = boto3.client('s3')
    bucket_name = event['bucket_name']
    base_url = event['base_url']

    links = get_links_within_domain(base_url)

    for link in links:
        try:
            page_response = requests.get(link)
            page_response.raise_for_status()
            page_soup = BeautifulSoup(page_response.content, 'html.parser')
            page_content = page_soup.prettify()

            file_name = "homepage.html" if link == base_url else link.rstrip('/').split('/')[-1] + ".html"
            s3_client.put_object(Bucket=bucket_name, Key=file_name, Body=page_content)

        except requests.exceptions.RequestException as e:
            return {"errorMessage": f"Failed to fetch {link}: {e}"}
        except Exception as e:
            return {"errorMessage": f"Failed to upload {link}: {e}"}

    return {"message": "Files uploaded successfully."}
Adding dependencies using Lambda Layers
The code above requires packages like requests, boto3, and BeautifulSoup4, which aren’t automatically installed on Lambda. To resolve this, we turned to Lambda Layers.
- Launched a t2.micro EC2 instance running Ubuntu.
- Granted the EC2 instance permissions to write to our S3 bucket where custom layers are stored.
- Ran the following instructions to update the environment if needed and create the necessary dependency structure.
					sudo apt-get update # Update environment
Python3 -V # Check python version to check if it needs updating
pip3 # Check if pip3 is installed
sudo apt install python3-pip # Install pip3 if needed
zip # Check if zip is installed
sudo apt install zip # Install zip if needed
sudo apt install awscli # Install AWS Command Line Interface
mkdir -p build/python/lib/python3.X/site-packages # Create dependency structure, X is the python version. We're using X = 12
4. Installed all the packages we wanted for our layer on the EC2 instance.
					pip3 install requests -t build/python/lib/python3.X/site-packages
pip3 install boto3 -t build/python/lib/python3.X/site-packages
pip3 install beautifulsoup4 -t build/python/lib/python3.X/site-packages
5. Zipped the packages and uploaded them to S3.
					cd build/ # Go to the build folder
zip -r layer_dependencies.zip . # Zip current directory
aws s3 cp layer_dependencies.zip s3://lambda-layer-dependencies-s3-bucket
6. As we uploaded our dependencies zipped on S3, we created a new lambda layer and uploaded the zipped file there.
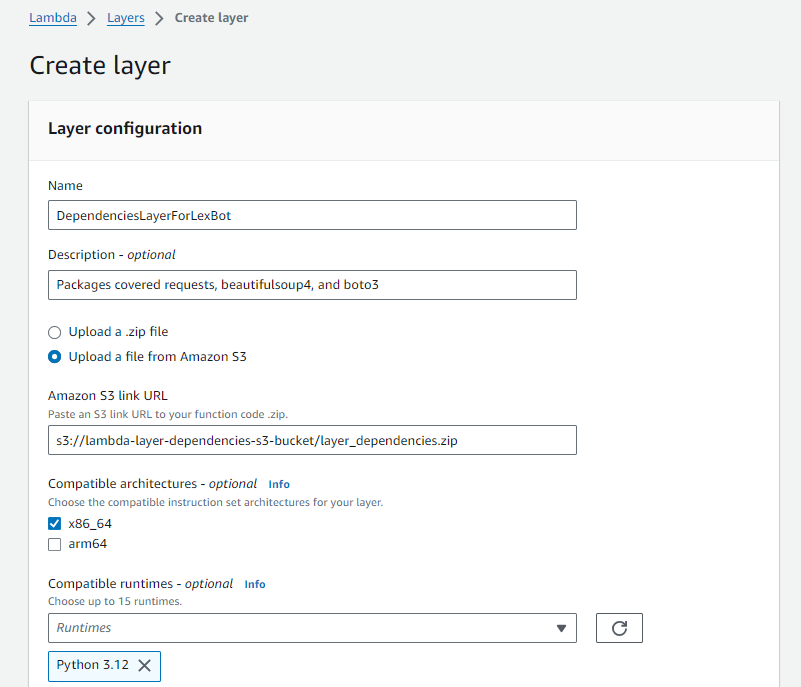
7. Afterwards, we attached our new lambda layer to our lambda function.
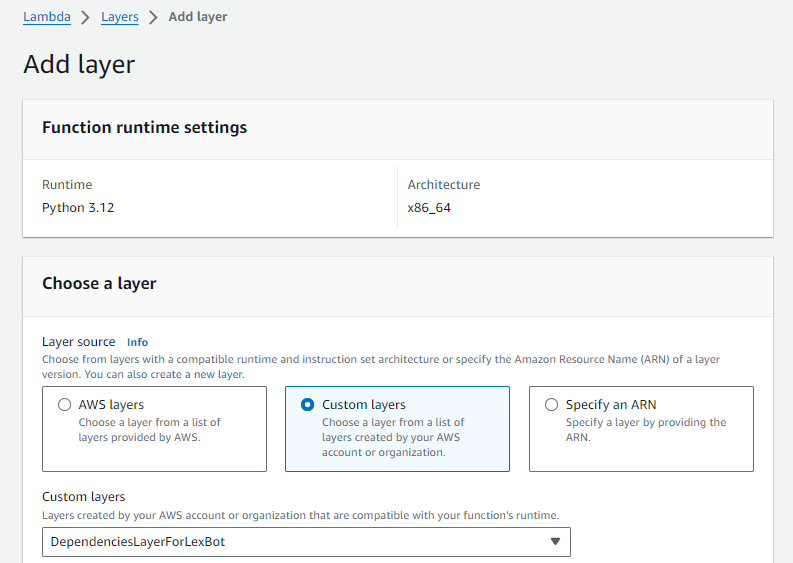
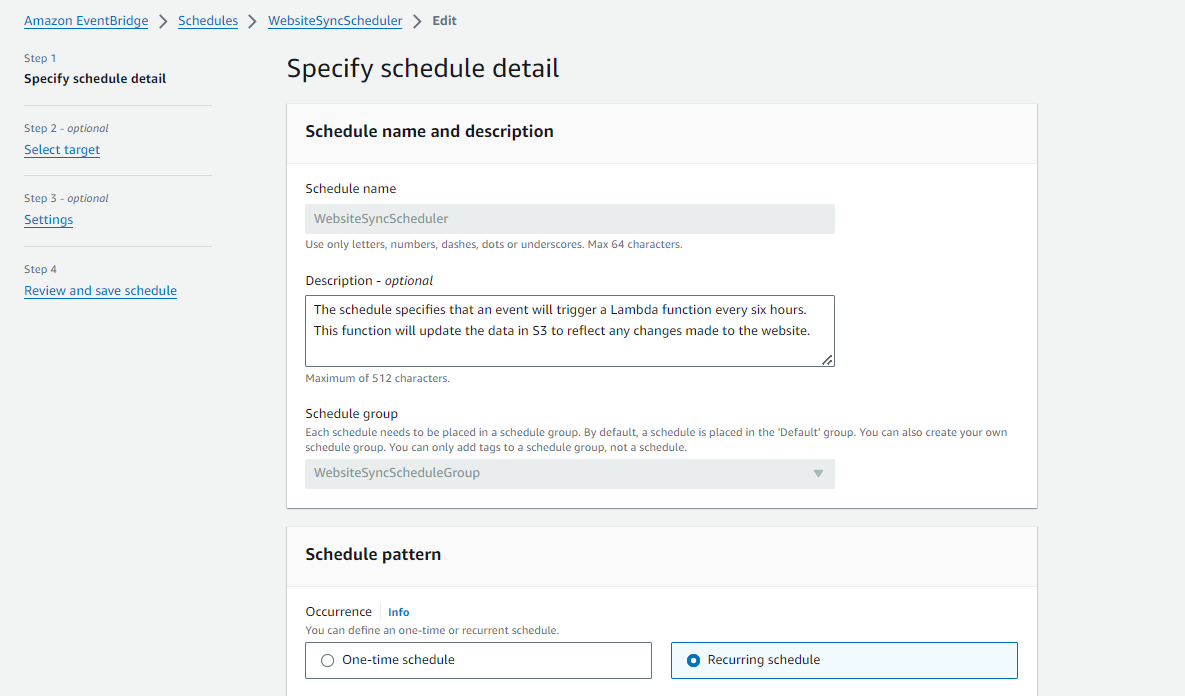
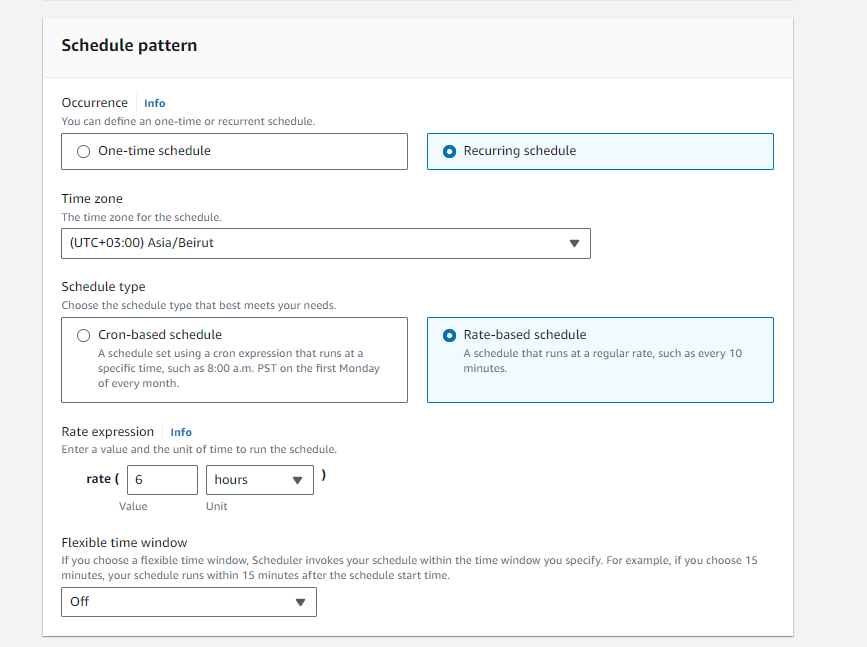
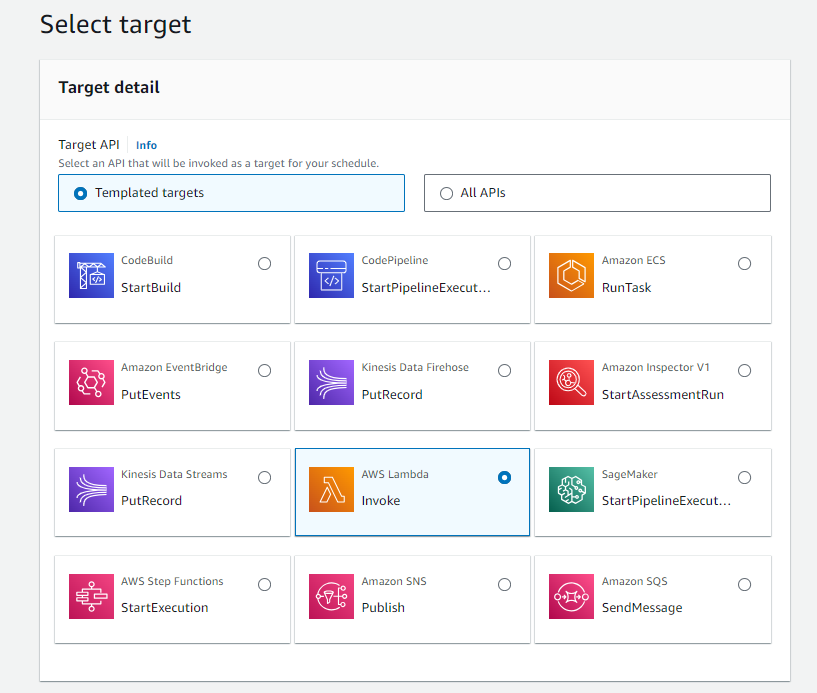
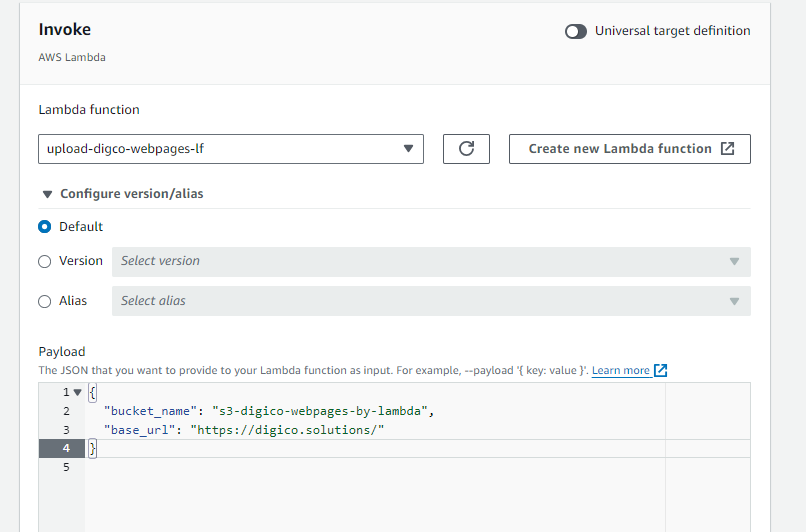
Following that, we aimed to automate the process of updating the data stored in the S3 bucket every six hours to ensure it remains current with any content updates made to the website. To achieve this, we utilized EventBridge scheduling, specifying the payload as our base URL and the bucket name. As demonstrated below:
After completing this step, we verified the S3 bucket following the execution of the function triggered by the schedule to ensure everything was functioning well. As depicted in the image below, all the web pages from our website are now successfully stored within the S3 bucket.
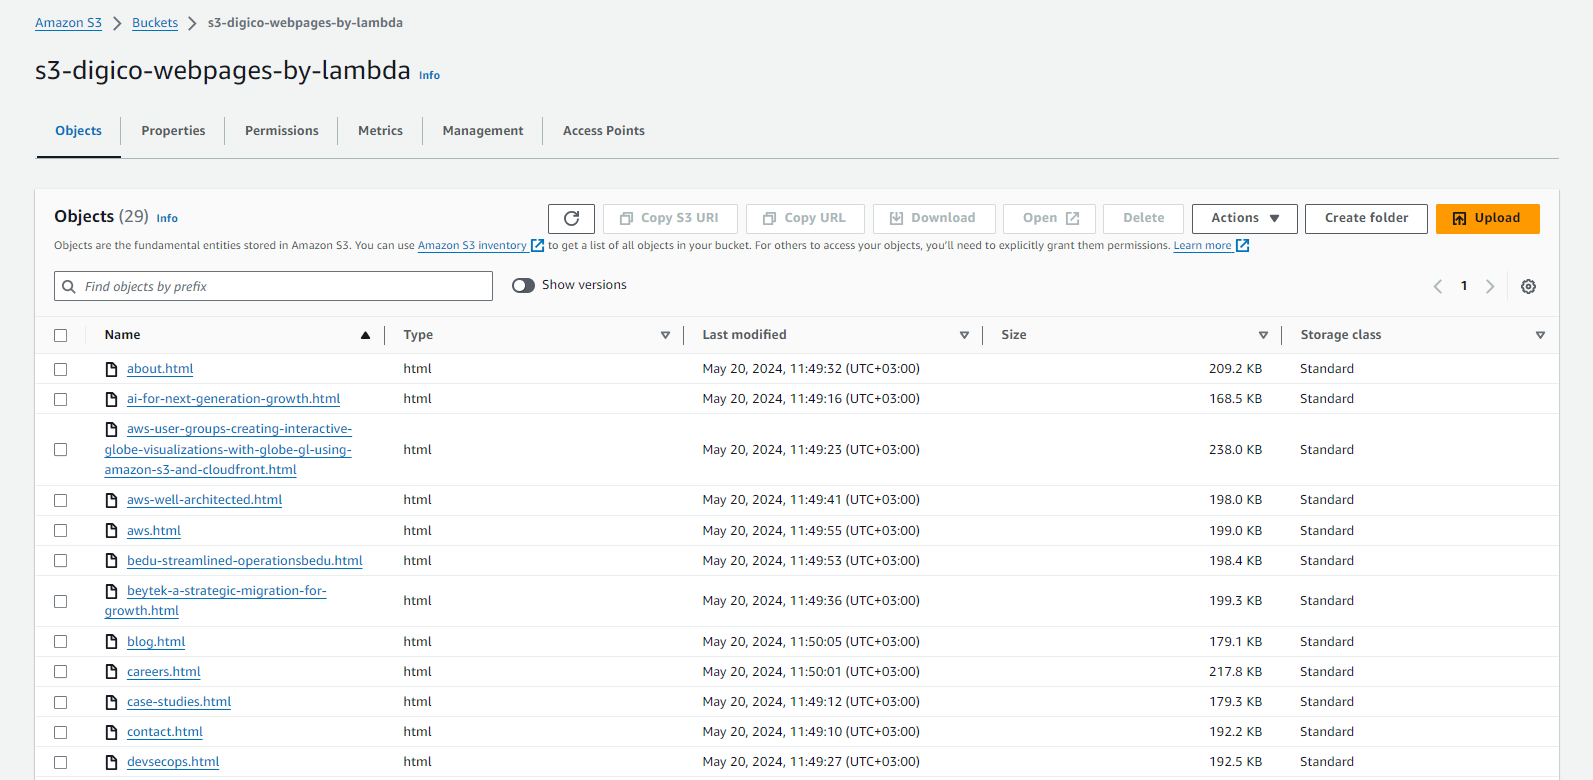
Now, we can proceed to the next stage of creating the Amazon Bedrock knowledge base.
Establishing the Amazon Bedrock Knowledge Base
- We began by providing the necessary details for the knowledge base.
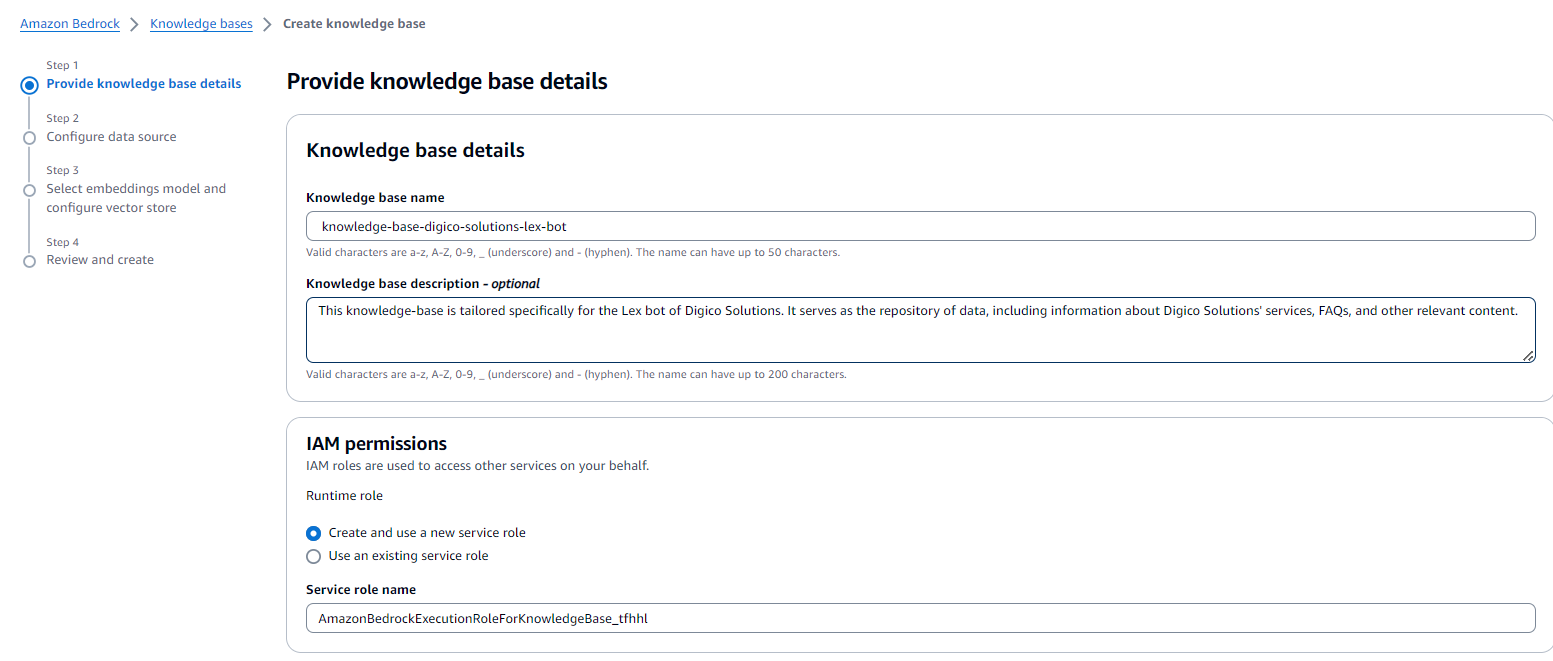
2. Next, we configured our data source, setting our previously created S3 bucket as illustrated below.
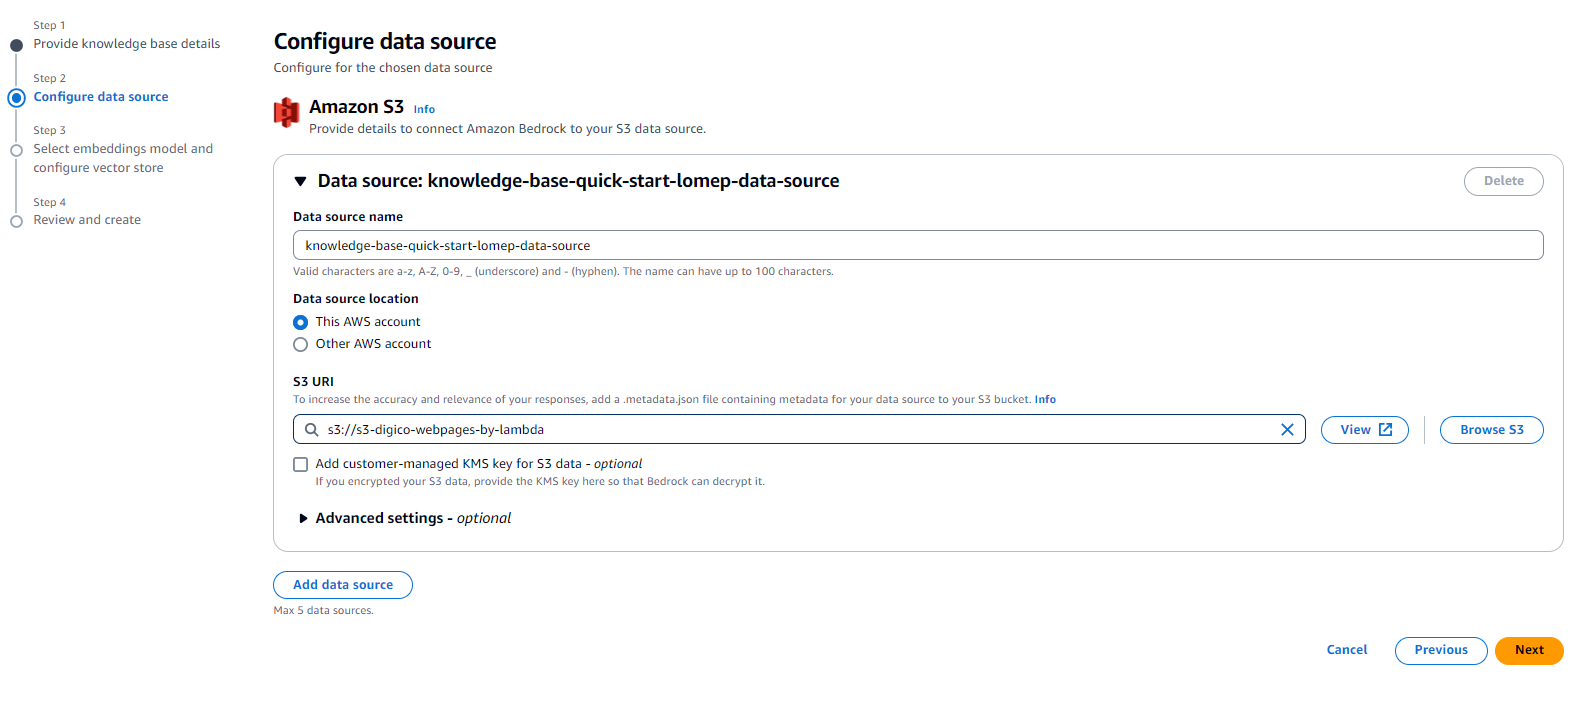
3. Lastly, we selected the appropriate embeddings model and configured the vector store to best suit our data.
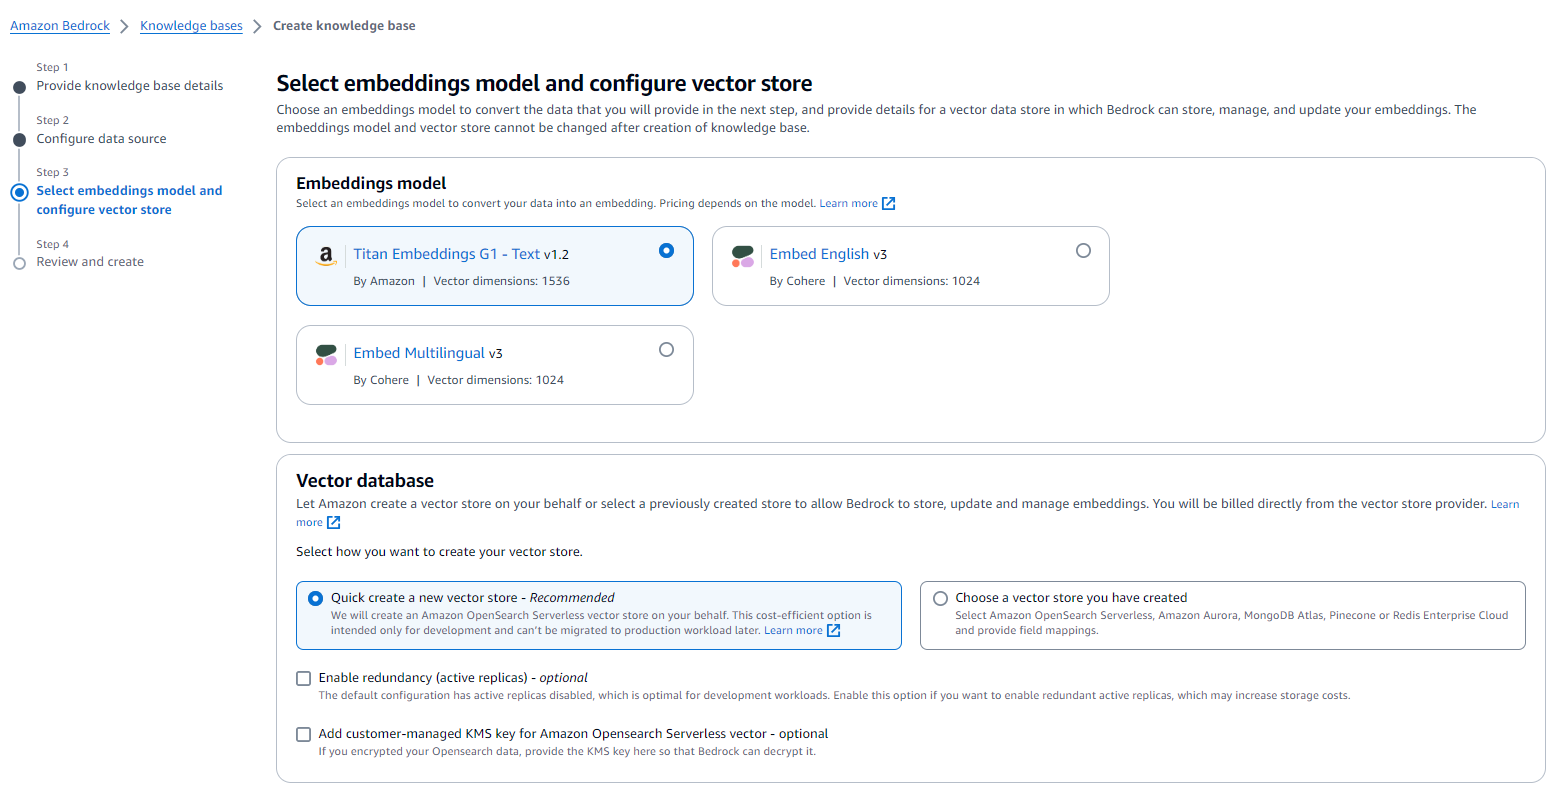
With everything set up and configured, we commenced the development of our Amazon Lex bot.
Building the Amazon Lex Bot

We started this step by choosing amazon lex bot’s creation method to be Descriptive Bot Builder, which is a newly added feature to amazon lex that allow us to provide description in natural language to have lex generate a bot for us using large language models.
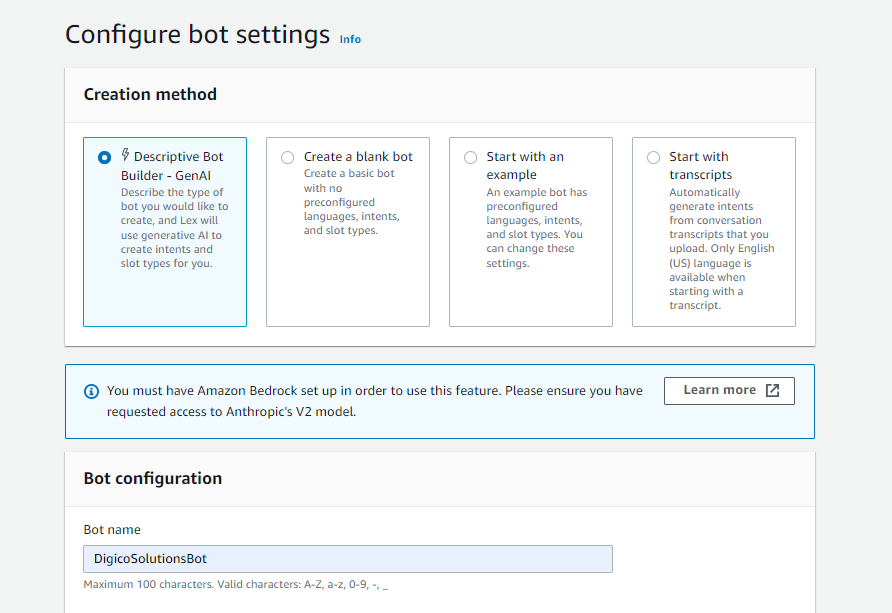
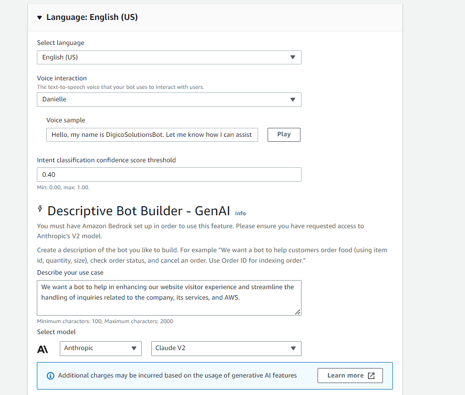
Upon configuration completion, we were directed to a dashboard featuring a section labeled “intents.” An intent, as we learned, serves as a mechanism to execute actions in response to natural language user input.
To harness the capabilities of GenAI with Lex effectively, we realized the importance of utilizing a bedrock-powered built-in intent. These intents leverage generative AI to fulfill FAQ requests by accessing authorized knowledge content.
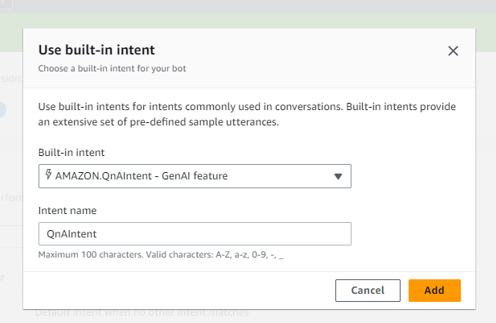
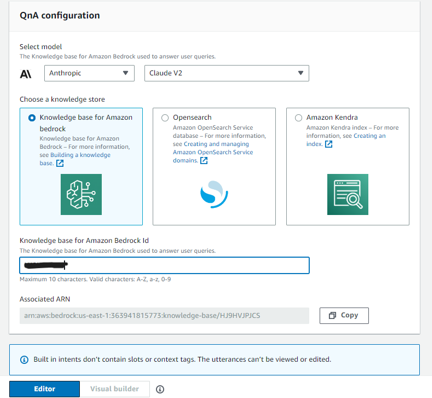
In the QnA Configuration section, we selected the knowledge base we had previously created. (You can locate the Knowledge Base ID in the Amazon Bedrock console)
To advance with bot creation, we had to establish at least one custom intent. We opted for the HelloIntent to reply to greetings (feel free to add whatever you feel needed). To create your own intents, it’s essential to understand two key concepts:
Slot Types:These define the types of data your bot expects to receive from the user. For example, a “Date” slot type would expect input like “today” or “next Monday.”Utterances:These are examples of what users might say to trigger a specific intent. For theHelloIntent, utterances could include “hello,” “hi there,” or “good morning.”
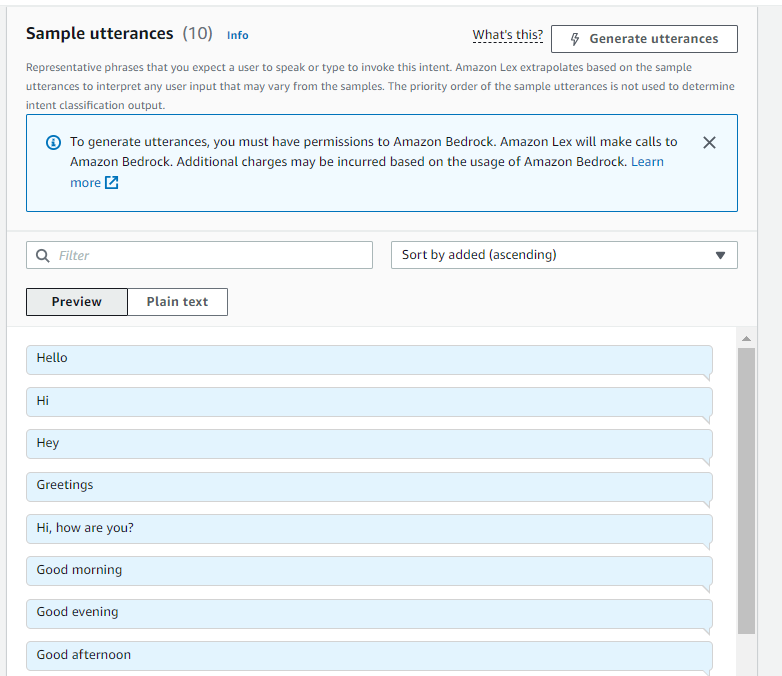
Thanks to Lex’s generative AI features powered by Amazon Bedrock, such as assisted slot resolution and sample utterance generation, we can easily add and configure slots and utterances for our intents. These advanced capabilities streamline the process, making it easier to define the various elements of our bot’s conversational flow.
Final Step
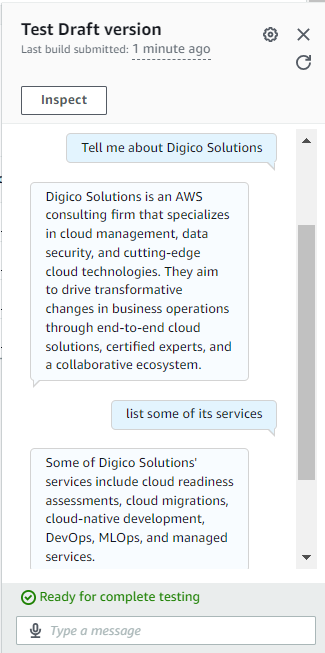
To test your bot, simply click the “Build” button followed by the “Test” button. Congratulations! You now have your first Amazon Lex bot powered by Amazon Bedrock up and running. Enjoy experimenting!
Conclusion
In conclusion, Amazon Lex and Amazon Bedrock offer developers of all levels a powerful toolkit for building chatbots that can deliver engaging user experiences across various platforms and applications. With their advanced capabilities and seamless integration, these services enable developers to create chatbots that can understand and respond to user inputs, driving enhanced customer engagement and satisfaction.


